When processing payroll, there are a series of steps to process through in order to completely submit payroll. The guide below will go through all steps start to finish including all those required when time keeping is being utilized. When navigating through the manual please note steps that are optional and tips in order to skip steps that may not apply to your specific payroll processing steps. If you have any questions or need help, please reach out to your payroll specialist.
Please note - Starting August 2026 through September 2026, our New Payroll Experience will be rolled out and the new process steps can be found within the New Payroll Experience Article.
STEP 1: Process Withholding Forms
1a. Hover over the Payroll Widget and choose "Withholding Forms to Approve" or for full navigation:
Navigation: Hamburger Menu > Team Tab> HR > Forms > Gov't Forms > Withholding
1b. Once in the Withholding report, filter to see all "Employee Completed" forms by entering "Employee Completed" in the
RED BOX below.
1c. Once filtered, choose all boxes on the left that you wish to "Process" - Note, only one type of agency can be processed at a time, for example, all California can be selected and then processed, then Federal can be processed from there. After all, the boxes are chosen, choose "Process" in the upper right corner.
To view the form and/or add supporting documents, choose "View".
TIP:
If you'd like to save your filter for future payrolls, choose the
 ellipses and choose "Save" or "Save As" and make this your default.
1d. Click Green Leaf Logo to navigate back to the home screen.
STEP 2: Navigate to Start Payroll
2a. Hover over the Payroll Widget and choose "Payroll Processing" or full navigation: Hamburger Menu > Team Tab > Payroll > Process Payroll
Choose the Payroll Prep Process icon

to start the payroll for the given check date.
TIP: Below is an overview of the screen and information to update based on the view you prefer as well as helpful information.
RED BOX:
by clicking the "blue pill" you can change the date range of view seen. By choosing the pill, additional options will appear. To view all payrolls, open the pill, then choose "All" from the second drop-down under the date range.
GREEN BOX:
in order to look for the upcoming check date, you can filter by date range by clicking the small arrows that appear to the left of the "Pay Date", which allows ordering checks in ascending or descending based on your preference. Be sure to save changes to filters by choosing the bottom
 and save or save as.
BLUE BOX:
this is the "Payroll Prep Process" which will allow you to start the payroll.
YELLOW BOX:
Payroll Quick Links will allow for easy access to payroll reports for the given check date.
STEP 3: Prepare Time Keeping Hours for Payroll ***(if non time keeping, check the box and skip to Step 4)***
3a.
Click the words "Go To Time Prep"
this will take you to a new screen to process through all steps needed to prepare hours for payroll.
3b. Pending Time Off Requests
If there are any pending time off requests for this time period, there would be an alert below the step. To process any pending Time Off Requests, click on the words "Pending Time Off Requests".
Once in the Pending Time Off Request Screen, any employees with pending requests would be listed. To process the requests or reject, simply check the box next to the employee
(RED BOX), then choose "Approve Checked Requests", "Reject Checked Requests", or "Modify Requests".
(BLUE BOX),
if there are no requests as seen below or all have been approved, rejected, etc. choose the back button
(GREEN BOX)
Now you can check this step off by checking the box next to the step.
3c. Pending Timesheet Change Requests
This step will tell you if there are any change requests, that have not been handled throughout the pay period.
In most cases, you should not see any pending change requests, but if you do, similar to the first step, click on the words "Pending Timesheet Change Requests". Once on the screen, any pending requests will appear. Check the box next to the employees then "Approve", "Reject", or "Delete" if the request was handled manually already.
Once you're done with this step, check the box to mark it as complete.
3d. Review Timesheet Status
This step is meant to ensure all timesheets are in an approved state in order to process the payroll. As seen below, if any timesheets have not been approved, there will be an alert with an action item to approve the pending timesheets in "Open" status. Click on the words "Review Timesheet Status" to process pending time sheets.
TIP/Note: The system wants all time that is in the system to be "Approved". With that being said, do not reject timecards if the hours are correct, even for termed employees. All rejected timesheets need to be fixed and then "Approved". Any hours not meant to be paid will be handled in payroll. Any "Open" statuses need to be converted to "Approved" to move to the next step.
Once in the "Review Timesheet Status" screen as seen below, select the box next to the employees with "Open" timesheets in the
GREEN BOX , then choose your action item in the
BLUE BOX
to "View Time Sheets (where you can make edits to the timesheet before approval), "Approve" if the hours are accurate, or "Reject" if the employee or manager is responsible to finish edits before approving.
Once all "Open" time sheets have been processed for approval, choose your back arrow.
Then check the box, marking this step complete.
NOTE: if you do not approve all timesheets, you cannot move forward. The goal is to get all timesheets in approved status.
3e. Reapply Pay Calculations
This step ensures that all totals captured during timesheet adjustments and processing are processed one last time before moving into payroll.
Choose the words "Reapply Pay Calculations"
The window below will appear, choose "Ok"
Warnings will appear for any employees without hours. In most case you may see all salary employees on this list or hourly employees that did not work during the pay period. Any warnings of this type are OK!
Now you can choose the back button and mark this step complete.
NOTE: If any changes were made to employee pay calculation profiles, this would be a step we would want to come back to. For example, an employee didn't have overtime calculating as California Overtime because their profile had them assigned to overtime for 40 hours in the week, after the pay calc was properly applied, we would need to come back to this step and "Reapply Pay Calculations" to get updated totals.
3f. Process Records
This step wants to process all of the work we have done up to this point. Think of it like putting a bow on the time-keeping present. :)
Choose the words "Process Records"
The window below will appear. Choose "Run"
When the system has run the data, you will be redirected to the processing list and can now mark this step as complete.
If you get this error:
You will need to check on the employee record and update the "Pay Type" to Hourly then "Process" the timesheets again to resolve the issue.
3g. Review Results
If there are any errors, you'd see them here. Some errors may say that there is an E/D that is not associated. If this is the case, reach out to your payroll specialist. If the type of time giving the error is related to unpaid time off, you can remove the unpaid time off from the timesheet since it's not related to payroll to move forward.
3h. Lock Pay Period
This step will lock all timesheets and ensure no changes are made by managers as you get ready to officially start payroll.
3i. Go To Payroll Prep
This step is taking you back to start payroll. Choose the words "Go to Payroll Prep" at which time you will be directed back to the payroll list to get going on the payroll.
You can now check the box marking "Go to Time Prep" as complete.
STEP 4: Working Through Payroll Steps
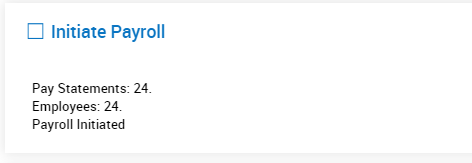
4a. Initiate Payroll
This step creates pay statements for all that we expect to pay. The system will bring in employees based on preferences. In most cases, employers would want to bring in all active employees including salary employees. If the intention is to have only active employees included and exclude terminated employees, a filter may be needed. If you're not sure about which option makes sense for your payroll, reach out to your payroll specialist to assist. Once filters and options are set, you can use the settings moving forward.
Choose the words "Initiate Payroll" and then based on your intentions listed below choose accordingly:
Option 1: Only bring in Active Employees, I don't want to pay employees I termed already. This Option is the best fit for clients with only one Payroll Pay Period for the EIN being processed.
Check the box next to "All Active" then choose "Regular" from the drop down. Choose "Initiate"
Option 2: "All on Assigned Pay Period. This option is best fit for clients with more than one pay period per EIN, such as Semi-Monthly and Bi-Weekly or an EIN that has 2 different locations or bank accounts that process completely seperate payrolls.
Choose the box next to "All on Assigned Pay Period" and choose "Regular" from the drop down, then choose "Create Now"
After created, you will see the number of pay statements created. Keep in mind, this number could change as you go through the editing steps of the payroll. This is simply creating blank pay statements for all active employees in the system both hourly or salary. As you go through the following steps, pay statements that don't' have hours added will auto delete, lowering the pay statement number before submitting.
Check the box and mark this step as complete.
4c. Sync Time (if non-time keeping click, skip)
This step is where the magic from all of the time-keeping steps pulls into payroll.
Choose the words "Sync Time" to initiate the step.
Choose the box next to the time-keeping pay period to sync. Then choose "Sync Time".
Once synced, mark it as complete.
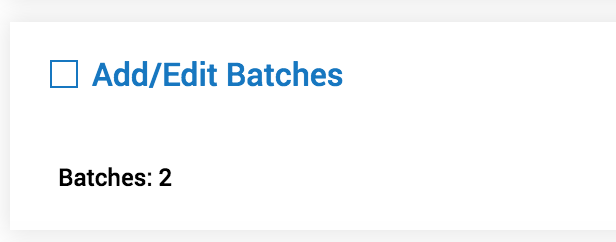
4d. Add Edit Batches (Optional)
This step is optional and usually used for clients with a large amount of data to key or import for data housed outside of time-keeping such as tips, commissions, bonuses, hand-keyed hours, or imports from 3rd party time-keeping systems. If your payroll is only hours and salary, you can skip this step altogether. Below are steps for keying data and separately, importing data.
Note: For large companies, more than one processor can add data here for the same payroll simultaneously. If you open the batch for any reason, be sure to close the batch before moving to the next steps.
 Option 1: Hand Keying Data in Batches (Skip if Not Keying Data)
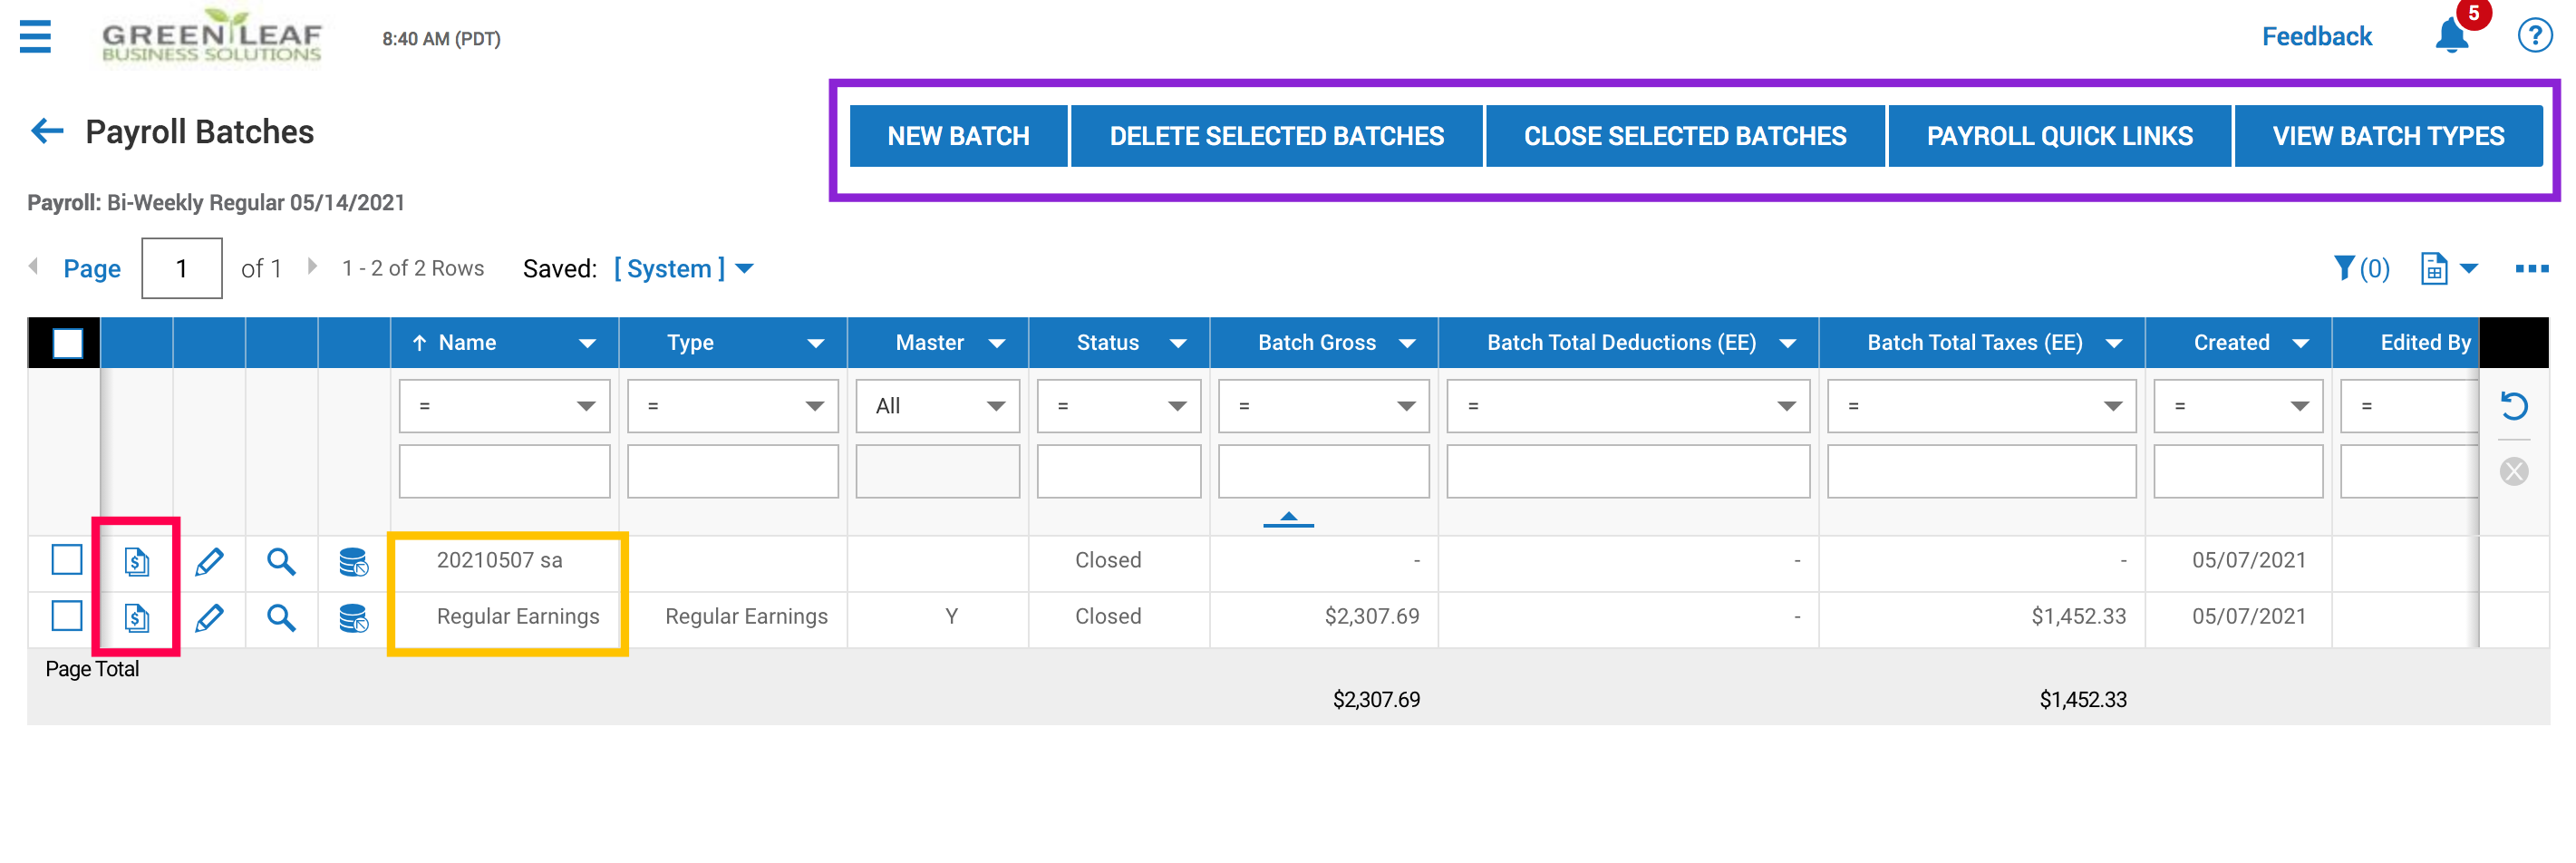
a. Click into the the words "Add/Edit Batches"
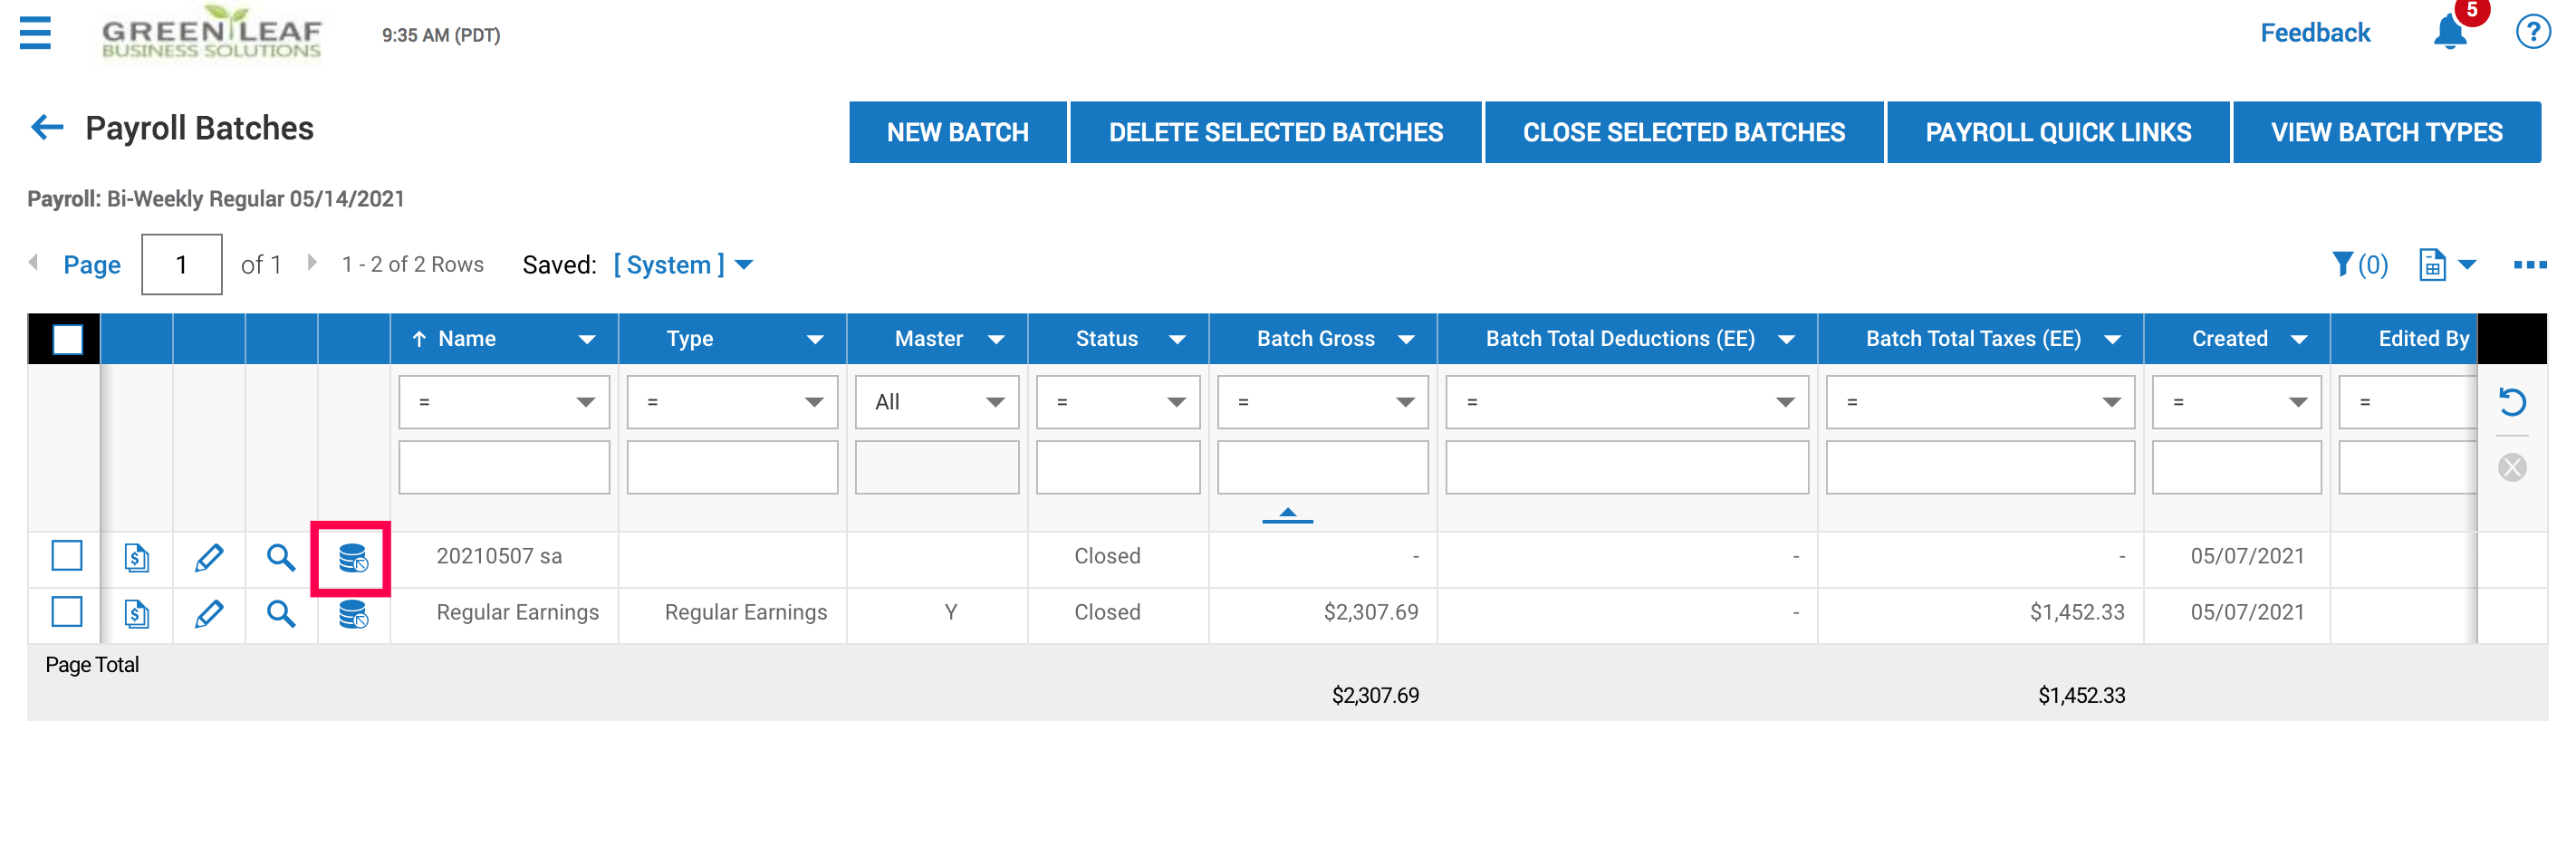
Once open, the view will look like below. If no time keeping was pulled in, you'd only see one batch. In this example you can see there are two batches, one is from the hours we pulled in (the top one) and the second is for all of the salary employees assigned to the payroll that pulled in when we "initiated" the payroll.
b. The
RED BOX
is where we will choose to "Open Batch For Edit".
The
PURPLE BOX
indicates the action items we can take AFTER we have made changes to the batches. The goal on this step is to make the edits and eventually "Close Selected Batch". "New Batch" would allow you to add a separate batch to process. Note: When adding additional batches, you could choose a different pay statement type, which would allow for you to create a second check for employees such as a second check for Commission. "Delete Selected Batches" would allow you to wipe away a batch that was an error or not needed. "Payroll Quick Links" will allow you to view payroll reports live at any step during the payroll steps. "View Batch Types" will allow you to see what types of batches available. If you need another type of batch, reach out to your payroll specialist.
The YELLOW BOX shows the name of the batch. This will help indicate where the data came from such as the top one showing it was system generated for hours. This is helpful when multiple people within the company process payroll.
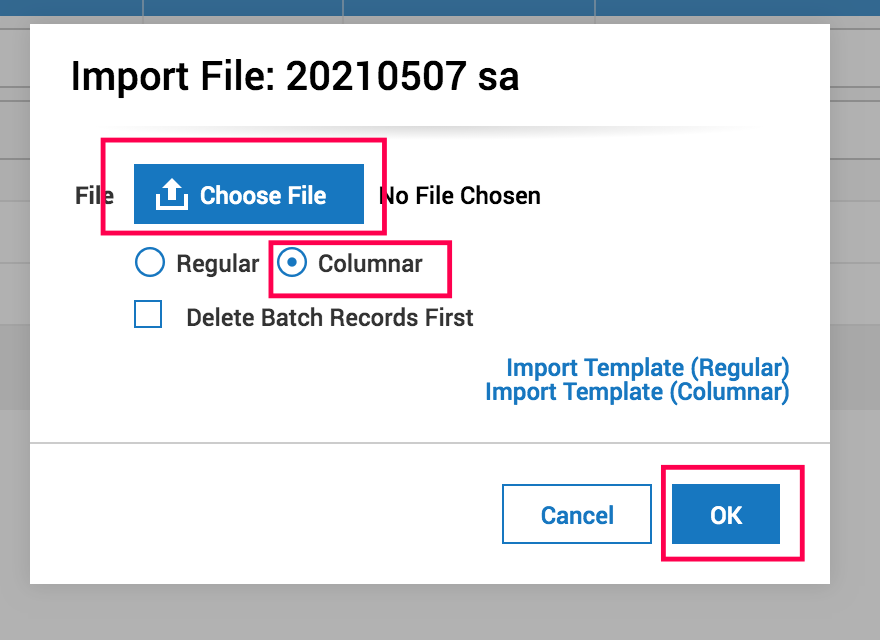
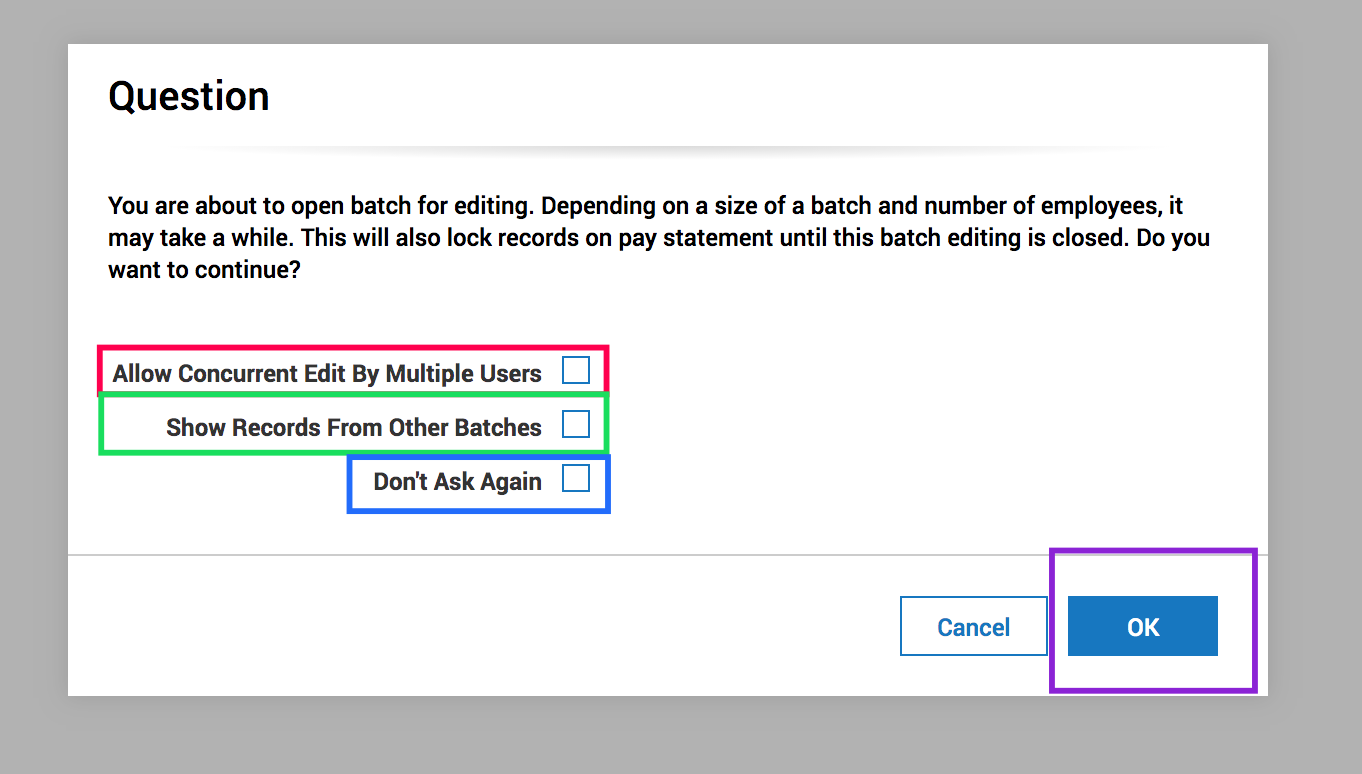
After choosing "Open Batch For Edit" the pop up below will appear. If none apply, simply choose "OK"
RED BOX: Allows more than one person to work on the payroll at the same time
GREEN BOX: Will show work from other users. Advised for users that need to overlap work or ensure no duplication.
BLUE BOX: Ensures you don't see this box again. :)
PURPLE BOX: After selection or no selection of options, choose "OK"
c. Now information can be keyed under the applicable earning code as seen below.
GREEN BOX: The "Select Columns" option will allow you to add or remove data not needed in your view. For example, if you only need to key Regular, Overtime, Sick, and Bonus, you'd want to choose "Select Columns" then remove all data not needed, add only needed codes, then save your view for future to ensure easy batch entering.
LIGHT GREEN BOX: After views are updated and saved from the GREEN BOX, the "Settings" Gear will be where you save views and access saved views created by choosing "Load Saved Settings".
RED BOX: Key in hours or $Amount under the appropriate earning code. By default all earning types are listed and in alphabetical order. The GREEN BOX will allow you to change your view for easy keying in the order you'd prefer. You can scroll to the right to see all earning available.
PURPLE BOX:
Indicates the pay statement type. In this example, we only see regular which would mean any additional lines for an employee with the same pay statement type "Regular" would all go onto the same pay statement. If your intentions are to cut a second check, add a line for an employee then choose a different pay statement type, the system will then create a second check for the employee once the batch is Closed.
YELLOW BOX:
Allows you to add additional rows for employees.
LIGHT PURPLE BOX:
After all data has been entered, choose Save & Update Payroll. If you only choose, "Save" you're only saving your work, but not updating to the payroll.
d. After all data has been keyed, not needed lines deleted, be sure to "Save & Update Payroll" then "Close Batch". and choose the back arrow.
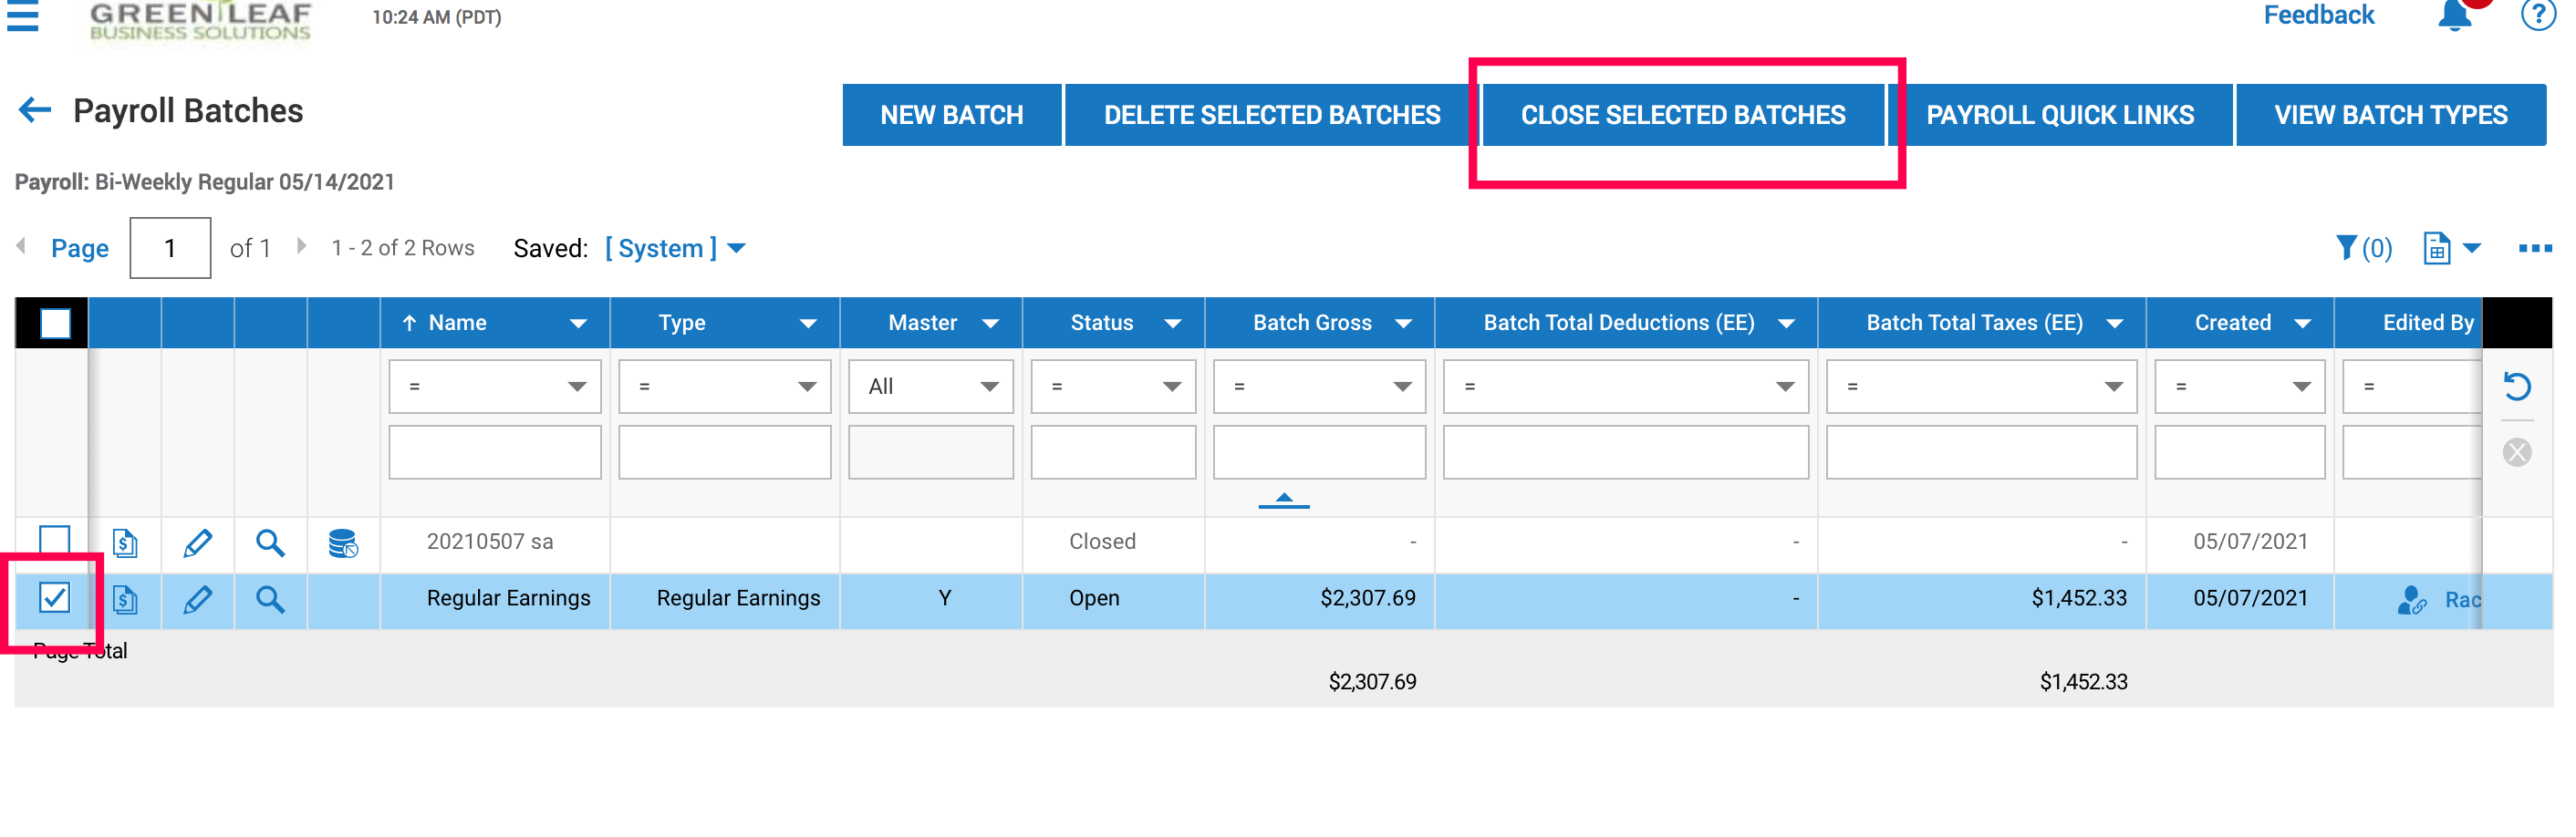
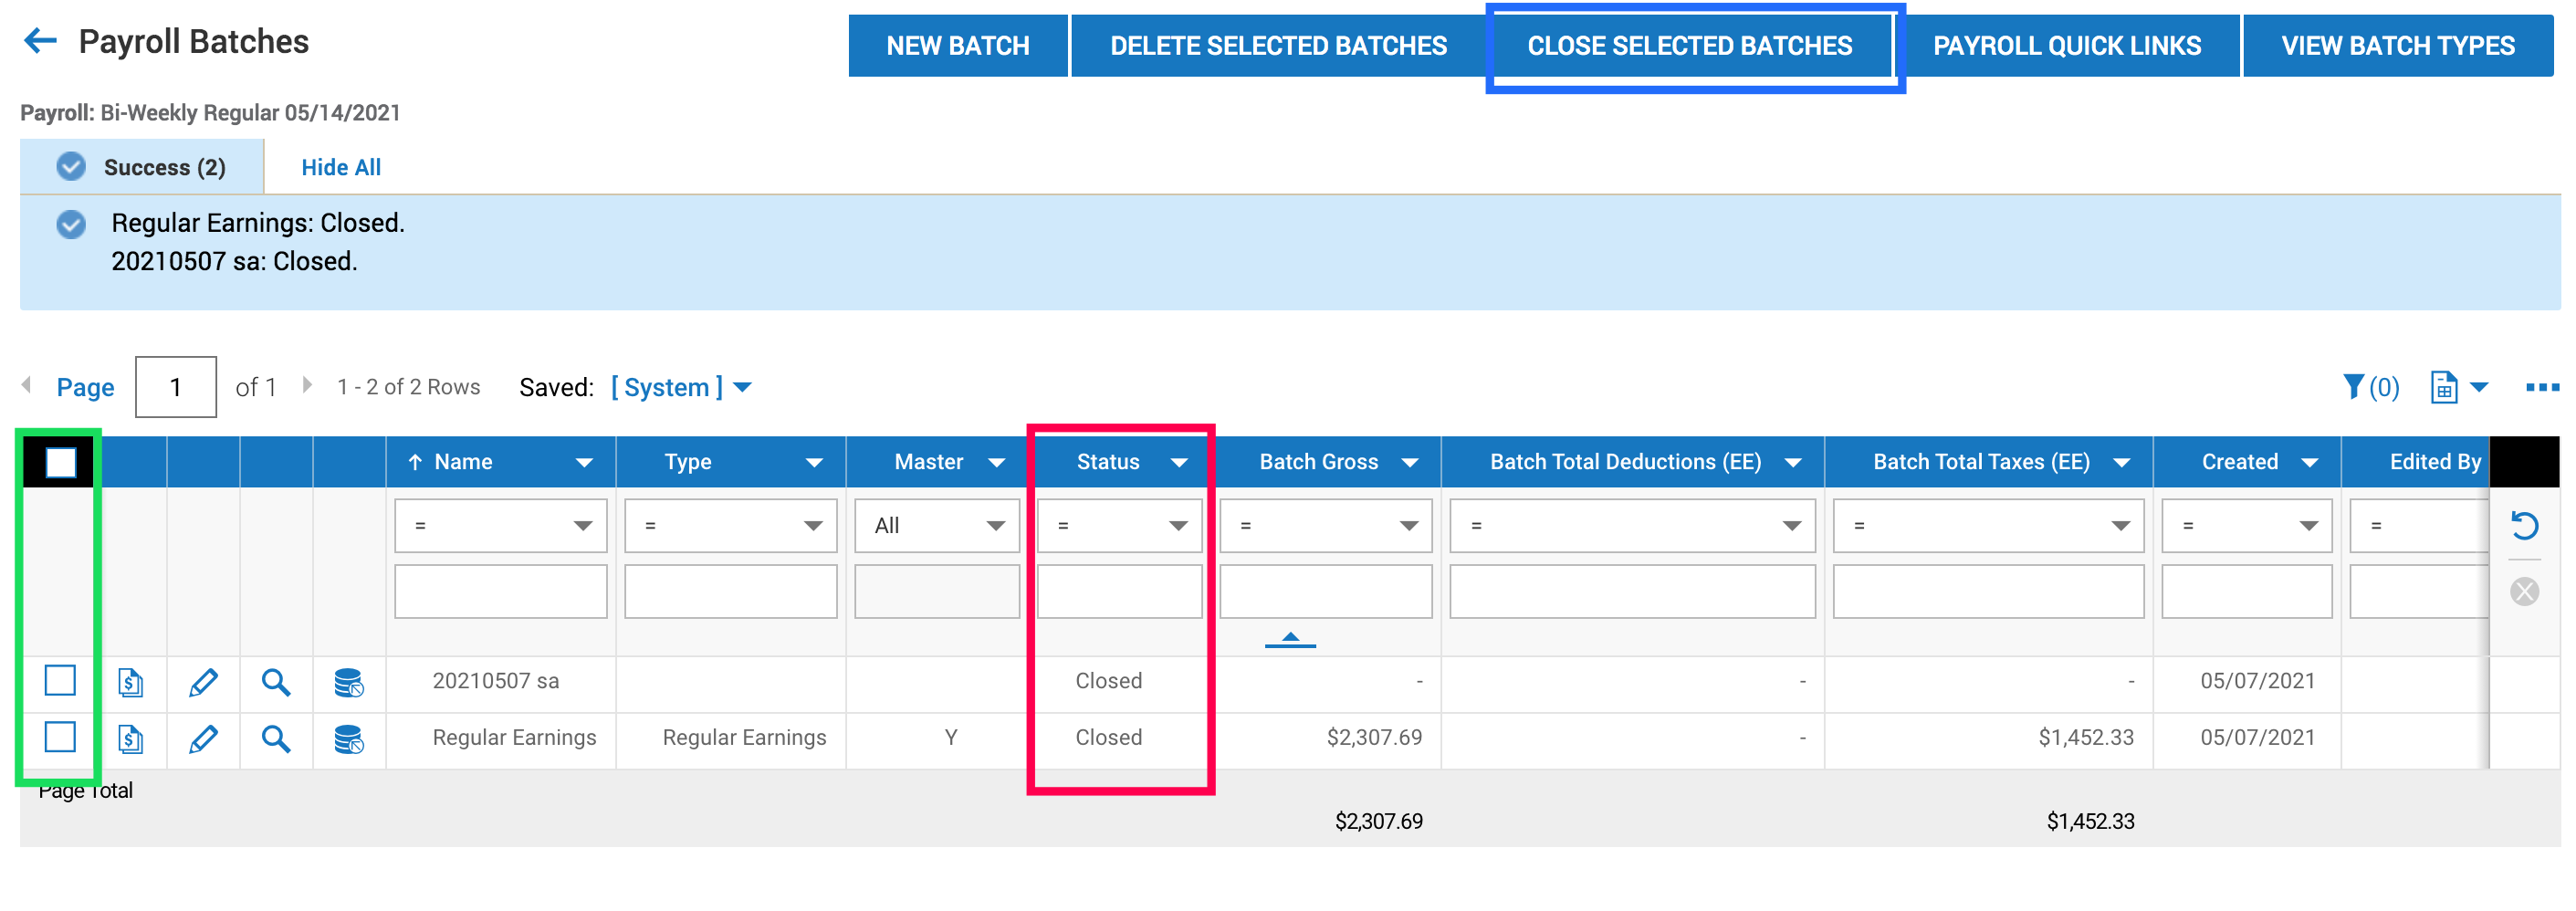
The back arrow will take you back to the first page of viewing the batches. Here you need to check that batches are "Closed" as seen in the
PURPLE BOX in order to move to the next steps of payroll. If they are "Open" and need to be closed, choose the boxes next to the batches in the
GREEN BOX and choose "Close Selected Batches" from the
BLUE BOX.
Choose the Back Button
e. Now mark this step complete by checking the box!
Option 2: Importing Data (Skip If not Importing)
a. Click into the words "Add Edit Batches"
The next screen will look like below. We will be choosing the "Import File" Icon in the RED BOX.
Note: If there is more than one batch, you can add the file to either. The two batches below indicate the hours pulled into the payroll in the first batch, and the second is the batch created for salary employees. As long as the import pay statement is the same as the batch here, for example "Regular," the data imported will appear on the same pay statement as the current data (hours in this example) that is already in the system. Imports could include all data or partial data depending on your process.
b. Prepare Your Import
First, we will need to get a template to fill out OR use the attached template already created at the bottom of this article.
Choose "Import Template (Columnar) words to download the template.
Note: The raw document that downloads will require you to fill in all data found in the PURPLE BOX for the coding related to the earning types you'd like to import. The template attached will fill in some of the more common earning codes and give examples. Only sections listed below are REQUIRED.
How To Complete The Template:
RED BOX: Enter the Company Short Name for every line that has data. Do not fill out lines that do not have data.
GREEN BOX: Enter the employee number. On this step, if your reports you pull data from don't have employee number, you can use Username (Elevated User Name), Badge Id, or SSN# instead. Only one option is required.
BLUE BOX: Enter the pay statement type for any line that has data. In most cases, regular would be used. If an employee is on the import more than one time, but the pay statement type is regular for each instance, the data on the import will all populate into one pay statement in the payroll.
PURPLE BOX: Columns N and on will be custom per client. The headers must be entered based on the earning types you are intending to import. The pattern for the header is "E" (for earning) followed by the earning name "Regular" then the word "Hours" or "Amount" based on how the data will be keyed. For more earning codes, please see the template attached on the additional tabs for instructions, examples, and earning codes. If codes needed are not listed, search "Earning" in the search bar of the hamburger menu, then choose "Earning Codes" to identify the exact spelling needed for the codes.
Note: For hours, be sure to use Decimals, not hours + minutes. For Salary Amount, enter the amount to pay on the payroll, not the annual salary.

After all data has been updated, save your file.
Note: only the first tab will import, it's okay to save the document with additional tabs for future use, etc.
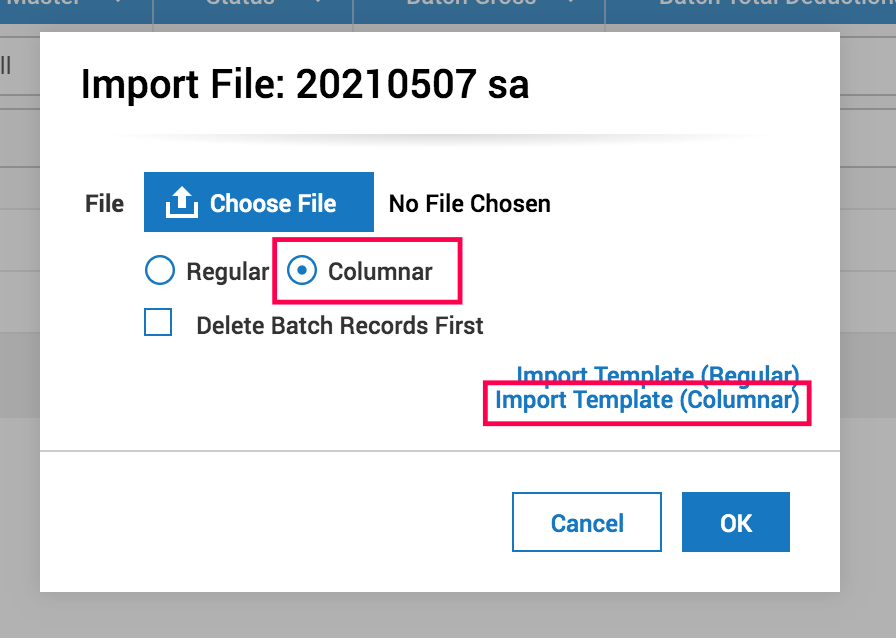
Import:
Go back into the system, to the import file icon

.
This time, choose the file, indicate "Columnar", then OK.
If the file has no errors, choose the box next to the batch imported, then choose "Close Batch" as seen below. Then back button to mark this step complete. Any fine-tuning or additional into to add can be done on the "Add/Edit Pay Statement Step", which is next.
Note: If any errors appeared, the system will indicate what the errors are. In most cases, the errors would be related to data in lines that don't have earnings associated or an "earning code" not found. In that case, search "Earning" in the search bar of the hamburger menu, find Earning Codes, then see that the spelling needs to be. Update your file, then re-attempt. If the errors cannot be resolved, reach out to your payroll specialist for assistance.
After all batches are closed, move onto the next steps.
4e. Add/Edit Pay Statements
This step will allow you to review your work and make any fine-tuning changes, such as blocking direct deposit, adding one-off earnings, blocking deductions, adding time not pulled in from time-keeping, and deleting any pay statements that should not be processed.
Click on the words "Add/Edit Pay Statements"
Below is the screen that will appear and the breakdown of the function.
RED BOX:
"View Selected" will allow you to choose more than one pay statement box and view. "New Pay Statement" will allow you to add additional pay statements for employees not already on the payroll or second checks. Note: only one pay statement type can be used during any given payroll. If more than one check needs to be cut for the same employee, use a different type for the second. "Utilities" is used when blocking deductions, changing direct deposit checks to live checks and other advanced settings. "Payroll Quick Links" will allow for access to reports at any point during the payroll.
BLUE BOX:
To ensure the view you see is to your liking, be sure to expand the number of pay statements in your view by choosing "Page". For any saved views created, choose your toggle view under "Saved", to create a new view to see high-level information important while processing payroll, choose the "..." ellipses to Add/Remove Columns, and save the view you'd prefer for future payrolls.
GREEN BOX:
The "Pencil" icon will allow you to open up the pay statement to edit. The Pay Statement with Magnifying Glass will allow for a quick view of the full pay statement. The "X" will allow for quick deletion of the pay statement. The square icon with the person will allow you to quickly toggle to the employee's record for any last-minute changes needed for payroll, such as base compensation updates, etc.
To open a pay statement to edit, choose the "Pencil" icon.
The view below will cover most actions needed:
RED BOX(S): Any warning regarding the pay statement will appear. This warning shows that the address is not up to date. By clicking on the blue words of the warning, you can see more details.
GREEN BOX(S):
The top box is the quick link to get to the employee's record to update the errors during the payroll. For example, on this pay statement, we need to update the employee's address AND as you can see there is no pay rate (which appears upon saving), so we will need to update this employee's base compensation as well. Once you click into the employee, make changes, then save, you can come right back to the pay statement via the back buttons and "Save" on the pay statement to see the changes reflected.
PURPLE BOX:
"Add Rows" will allow you to add additional rows to add earnings or deductions. Note: upon saving, any assigned auto deductions/earnings will appear automatically. No need to add manually. If after "Save" no deductions appear that should be there, be sure to update the employee record in order to allow automatic deductions moving forward. Any blank rows will fall off of the pay statement once closed. No need to delete it.
YELLOW BOX:
this line is where Earning/Deductions can be chosen then amounts or hours can be entered. Note: hourly or salary amounts will appear as soon as "Save" is chosen.
BLUE BOX:
The "Save" button is similar to a recalculate button. After any changes are made to the pay statement be sure to Save. If you leave to update employee or company info (such as base comp, direct deposit, deductions, etc.) be sure to come back to the pay statement and SAVE in order to see if the changes affect the current open pay statement. Any changes on an employee record prior to opening the payroll will already be reflected during payroll.
After all, changes are made and saved, choose the back button to go back to the list of pay statements. Continue this process until all pay statements are as you'd expect to process for payroll.
For advanced options, choose "Utilities" while in the pay statement. The "Options" button will allow for a direct deposit block, etc. For any function needed not explained here, be sure to reach out to your payroll specialist.
After all pay statements have been reviewed, go back to the checklist. Here choose "Recalculate Pay Statements" as seen below. Then mark complete.
Note: The action of "Recalculating" will ensure all pre-processing reports are accurate including tax amounts. If you do not recalculate before pulling funding reports, quarterly taxes may not be accurate.
4f. Sign-Off Open Alerts
If there are any alerts, they would be here. Click on the alert to resolve. Typical alerts would be missing addresses, manual check alerts to acknowledge, alerting that new hires are being assigned to the state tax jurisdiction, etc. If any alerts are not self-explanatory and you need assistance, reach out to your payroll specialist. Otherwise, check the box and move to the next step.
Any payroll alerts created during the pay period will also show here. You can add the additional info needed and then sign off on the alert.
4g. Pre Process Payroll (Close Payroll)
This step is meant to close the payroll, not allowing any changes internally, while reviewing reports (if needed) before submitting. On this step as seen below, if there are no errors or alerts, simply choose the words "Close Payroll"
If there are errors as seen below, click on the errors to resolve them. Payroll cannot be closed until errors are resolved. Once resolved, come back and "Close Payroll"
Check the box and mark it complete.
If you need to re-open reach out to your payroll specialist for assistance.
4h. Run Accruals
This step will ensure all accruals are processed and accurate totals will show on pay statements.
Choose "Execute Accruals" as seen below.
The system will direct you to a report showing totals. Simply hit back, then mark this step as complete.
4i. View Payroll
This step just is a quick link to all reports related to payroll that you may want to see. Click on any report name to view.
Note: For more info on reports, search "payroll reports" in the Knowledge Center.
4j. Submit Payroll
Choose the words "Submit Payroll" and then "OK" as seen below.
If no errors appear and the payroll shows as submitted as seen below, you're done! We will take it from here!
Be sure to submit no later than 2 pm 2 business days before the check date. If you're processing any unscheduled payrolls or need assistance, please reach out to your payroll specialist. If you don't know who your payroll specialist is, email
payroll@greenleafbizsolutions.com. Be sure to include your short name in the Subject Line.


 e. Now mark this step complete by checking the box!